There’s somethin’ absolutely magical about drivin down a neighborhood street in December and seein homes transformed by the warm glow of Christmas lights. Whether your a seasoned decorator with boxes of lights carefully organized in your garage or a first-timer wonderin where to begin, outdoor Christmas lights have this remarkable ability to turn any home into a holiday spectacle that neighbors will slow down to admire.
In this comprehensive guide, we’ll explore 23 creative and doable ideas to elevate your outdoor Christmas lights display from basic to breathtaking. From classic white elegance to high-tech color-changing displays, we’ve gathered techniques that work for any budget, home style, or skill level.
Classic White Christmas Lights: Timeless Elegance That Never Fades
White Christmas lights remain the gold standard for creating sophisticated, elegant holiday displays that complement any architectural style. Their timeless appeal transcends trends, offering a clean, cohesive look thats equally at home on a modern farmhouse or a stately Victorian.
“White lights create a sense of calm and sophistication that makes a home appear more valuable and well-maintained during the holiday season,” explains Maria Peterson, interior designer and holiday decoration specialist at Urban Home Magazine. “They highlight architectural details rather than competing with them.”
For maximum impact with white lights:
- Choose warm white (2700-3000K) for traditional, cozy ambiance
- Select cool white (5000K+) for a crisp, snowy effect
- Use commercial-grade lights for consistent brightness across your display
- Vary density based on viewing distance—closer areas need fewer lights to avoid overwhelming brightness
Research by the American Lighting Association found that homes with professionally installed white Christmas lights can appear up to 15% more valuable to prospective buyers touring during the holiday season, making this classic choice not just beautiful but potentially beneficial for those with homes on the market.
Multicolor Magic: Creating Vibrant Holiday Celebrations
If classic white feels too restrained for your holiday spirit, multicolored lights offer exuberant joy that especially delights children and creates a playful atmosphere. However, creating a cohesive multicolor display requires some strategy to avoid visual chaos.
“Many people assume multicolor lights are inherently less sophisticated, but that’s simply not true when applied thoughtfully,” says Ryan Chen, holiday lighting coordinator for Bright Nights Events. “The key is using color theory principles—complementary or analogous color schemes rather than random combinations.”
Regional preferences for colored vs. white lights show interesting patterns. According to a 2023 HomeAdvisor survey of 2,500 homeowners, multicolored lights dominate the Southwest (68%) and Southeast (59%), while white lights are preferred in the Northeast (62%) and Northwest (57%).
For best results with multicolored displays:
- Consider limiting to 3-4 complementary colors rather than full-spectrum options
- Use larger bulbs (C7 or C9) for colored displays as they appear more intentional
- Create zones of color rather than mixing everywhere
- Pair with natural elements like garland and wreaths to ground the colorful display
One common mistake? Combining cool white with multicolored lights—the stark contrast rarely works visually. Instead, use warm white as a neutral base if incorporating other colors.
Tree Transformation Techniques
Trees provide the perfect vertical canvas for holiday lighting, but achieving professional-looking results requires understanding both light application techniques and the unique needs of different tree types.
For deciduous trees (those without leaves in winter), the exposed branch structure creates a beautiful opportunity for detailed lighting. Start at the base and work upward, using approximately 100 mini lights per foot of tree height for mature trees. This creates optimal density without overloading branches or creating fire hazards.
“The biggest mistake homewoners make when lighting trees is using too few lights and wrapping only the outer branches,” explains Mike Davidson, certified arborist and holiday lighting installer. “Professional displays achieve depth by working from trunk outward, with approximately 25% of lights on the trunk, 50% on main branches, and 25% on outer areas.”
Read this Blog: https://hometranquil.com/bloxburg-living-room-ideas/
For shrubs, net lights offer convenience but often lack the dimensional quality of hand-wrapped string lights. To achieve better results, consider layering—using net lights as a base layer, then adding a secondary layer of string lights on prominent areas for depth and interest.
Illuminated Pathways: Guiding Holiday Visitors with Style
Your pathway isn’t just functional—it’s the narrative introduction to your holiday display, building anticipation as visitors approach your home. Thoughtful pathway lighting improves safety while creating magical entry experiences.
“You can think of pathway lighting as laying down the visual runway for your holiday display,” suggests landscape designer Jennifer Morris. “It literally and figuratively guides people through your decorative story.”
For truly distinctive pathway lighting, consider:
- Alternating heights using a combination of stakes, lanterns and ground-level elements
- Creating rhythm through repeated patterns (every 3-4 feet works well for most paths)
- Using weather-resistant options—pathway lights face the harshest conditions
- Incorporating reflective elements like ornaments or mirrored stakes to multiply light effects
In regions with heavy snow, traditional stake lights often become buried. Cleverly countr this by using taller shepherd’s hooks (18-24 inches) or luminarias positioned on elevated platforms that stay visible despite accumulation.
For waterproof connections in wet climates, professional installers recommend dielectric grease on connection points followed by weatherproof tape and plastic bags secured with zip ties—a belt-and-suspenders approach that keeps pathways lit regardless of precipitation.
Solar-Powered Sustainability: Eco-Friendly Holiday Brilliance
The days of dim, unreliable solar lights are behind us. Today’s solar-powered Christmas lighting offers impressive brightness and reliability when properly selected and positioned.
Recent innovations in solar Christmas lighting for 2024 include:
- Integrated lithium-ion batteries with 3-5x longer run times than previous generations
- Multi-day storage capacity that maintains illumination through several cloudy days
- Remote controls and programmable settings previously only available in plug-in versions
- Improved photocell technology that adjusts charging based on available sunlight
“Today’s solar Christmas lights can rival plug-in versions in brightness and functionality,” explains environmental engineer Dr. Lisa Matheson. “The key difference is strategic panel placement—southern exposure with unobstructed sun access from 10am-2pm is essential.”
Cost analysis reveals solar lights typically cost 20-30% more initially but eliminate electricity costs and extension cord needs. Based on average December electricity rates of $0.14/kWh and typical usage patterns, solar lighting saves approximately $25-45 per season for medium-sized displays, yielding positive ROI in 2-3 seasons.
Common problems with solar lights often stem from inadequate charging. Position panels where they’ll receive maximum direct sunlight and clean them periodically—even light dust accumulation can reduce charging efficiency by up to 25% according to manufacturer testing.
Creating Winter Wonderlands with Icicle Lights
Icicle lights transform ordinary rooflines into magical winter wonderlands, creating cascading effects that mimic natural ice formations. The key to professional-looking installations is variation and proper spacing.
“Uniform, perfectly-spaced icicle lights scream ‘amateur installation,'” says holiday lighting professional Thomas Wilson. “Nature isn’t uniform—varying lengths by 15-20% creates organic-looking displays.”
For best results:
- Mix icicle sets with different drop lengths (12″, 18″, 24″) for natural variation
- Space icicles closer together on front-facing high-visibility areas (4-6″ apart)
- Use wider spacing (8-10″ apart) on side areas viewed from angles
- Consider color temperature carefully—5000K+ creates realistic ice appearance while 2700-3000K creates warm golden “candlelight icicles”
An interesting trend emerged during 2023’s holiday season: interior icicle applications. Designers have begun using icicle lights inside homes along window tops or suspended from ceiling beams, creating year-round ambiance that references both winter magic and trendy cafe lighting. This approach uses lighting as semi-permanent decor rather than seasonal decoration.
When installing icicle lights, professional installers recommend leaving them slightly loose rather than pulling tight—this allows natural movement with breezes, enhancing the realistic effect and preventing wire fatigue that leads to premature failure.
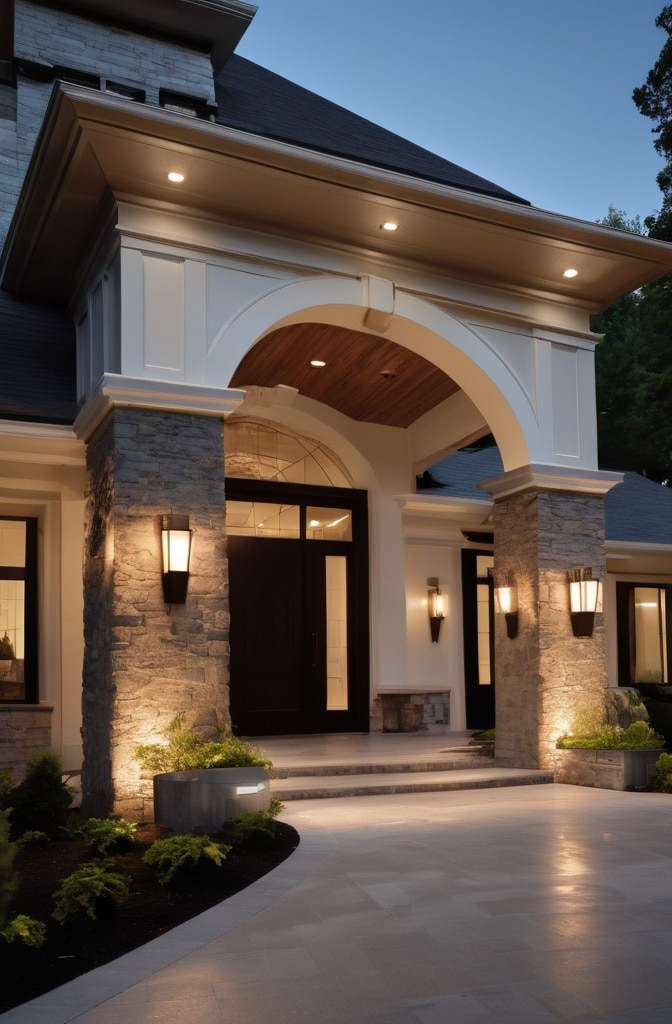
Roofline Mastery: Highlighting Your Home’s Architecture
The roofline serves as the crown of your holiday lighting display, defining your home’s silhouette against the night sky. Thoughtful roofline lighting doesn’t just add festivity—it strategically enhances architectural features while minimizing flaws.
“Roofline lighting is the framework that holds your entire display together,” explains architect Sandra Williams. “It’s remarkable how strategic lighting can visually correct proportion issues—extending lights beyond corners can make a small home appear larger, while breaking lighting at architectural transitions can visually separate overwhelming façades.”
Professional installation depends on appropriate fasteners:
- All-in-one clips that hold lights while protecting gutters
- Magnetic attachments for metal roofs that eliminate penetrations
- Ridge clips designed specifically for tile or slate materials
- Under-eave attachments for homes without suitable gutters
One common mistake homeowners make is damaging roof materials with improper fasteners. Avoid nails, screws, and staples directly into roofing materials—these create water entry points that can cause expensive damage. Instead, invest in proper clips designed specifically for your roof type.
For homes with architectural imbalances, lighting can provide visual correction. For example, when one side of your home extends further than the other, continuing lights beyond the shorter corner creates visual balance from the street view. Similarly, adding vertical drops at strategic points breaks up overwhelming horizontal expanses.
Column & Pole Wrapping: Vertical Statement Pieces
Columns and poles create vertical visual anchors in your Christmas display, drawing the eye upward and adding dimensional interest. There’s actual science behind effective column wrapping—the spiral-to-height ratio significantly impacts visual appeal.
“The classic barber pole uses a specific 1:7 ratio of spiral revolution to height,” notes decoration researcher Martin Goodwin. “This same ratio creates the most visually pleasing column wraps for Christmas lighting, regardless of column diameter.”
For standard 8-foot columns, this translates to approximately 5-7 spiral revolutions from bottom to top. Taller columns may need slightly fewer revolutions per foot to maintain visual proportion.
Light density calculations for columns depend on diameter:
- 6-8″ columns: 3-4 lights per vertical inch when using mini lights
- 10-12″ columns: 5-6 lights per vertical inch
- 14″+ columns: 7-8 lights per vertical inch
A creative twist gaining popularity involves using transparent colored films (similar to theatrical gels) over white lights. This approach allows homeowners to change color schemes seasonally or annually without purchasing new lights. Professional installers report this technique saving clients 30-40% compared to maintaining multiple colored light sets.
For natural columns like trees used as decorative elements, consider a slightly looser wrap pattern that follows the natural contours rather than forcing perfect spirals—this honors the organic shape while still creating deliberate visual interest.
Shrub & Bush Illumination: Net Lights Done Right

Net lights offer incredible convenience for covering shrubs and bushes, but achieving professional results requires more technique than simply draping and plugging in. The difference between amateur and professional-looking shrub lighting often comes down to careful preparation and layering.
“Before applying net lights, we always shape and prune shrubs to create a clean canvas,” explains landscaper and seasonal decorator Jordan Hayes. “Then we use two layers of nets on showcase bushes—one laid normally and a second rotated 45 degrees to fill gaps and create depth.”
For optimal results:
- Choose appropriate density—100 lights per 4’x6′ net for standard display, 150+ for focal points
- Select net color matching your foliage (green for evergreens, brown/white for deciduous)
- Secure edges with landscape pins to prevent wind displacement
- Consider plant health—remove lights periodically for inspections during extended display periods
Plant-friendly fastening techniques prevent damage while ensuring lights stay properly positioned. Instead of wire twist-ties which can damage branches, professional installers use silicone-based garden ties or specially designed plant-safe light clips that expand as branches grow.
For specimen plants or topiary displays, consider investment in commercial-grade net lights with reinforced connections and weatherproof controllers. Though 30-40% more expensive initially, their 3-5 year lifespan (versus 1-2 seasons for consumer models) makes them more economical long-term for serious decorators.
Candy Cane Path Creation: A Nostalgic Touch
Candy cane paths offer quintessential holiday charm while providing practical pathway illumination. Creating truly professional-looking candy cane borders involves more than simply purchasing pre-made stakes.
“The magic of a great candy cane path is in the spacing and scale,” says holiday display designer Michael Rodriguez. “Most commercial stakes are too small and flimsy. We create custom versions using PVC pipe wrapped with rope lighting—they last for years and create dramatic impact.”
DIY candy cane construction requires:
- 1/2″ PVC pipe (create 24-36″ stakes depending on desired height)
- Red electrical tape or red rope light
- White rope light or LED strip
- Clear zip ties or weatherproof adhesive
For optimal visual impact, space candy canes 24-36″ apart, with the curls all facing the same direction. This creates rhythmic visual flow that guides visitors naturally along your path. For added sophistication, connect the tops of facing candy canes with string lights to create illuminated arches over the pathway—transforming simple stakes into magical tunnels of light.
A unique addition gaining popularity incorporates subtle motion elements using programmable LED strips that create the illusion of spinning or movement along the candy cane stripes. While more technically complex, these animated displays create particularly engaging effects for children and serve as neighborhood conversation pieces.
Twinkling Magic: Creating Dynamic Light Displays
Twinkling lights add magical movement to otherwise static displays, but using them effectively requires understanding both their technical operation and psychological impact. The human eye naturally gravitates toward movement, making twinkle effects powerful attention-grabbers when strategically deployed.
“Twinkling lights should comprise about 15-20% of your overall display,” recommends lighting designer Rebecca Chen. “Beyond that percentage, the continuous movement becomes visually exhausting rather than enchanting.”
Understanding twinkle patterns helps create more sophisticated displays:
- Random twinkle: Individual bulbs flash independently (best for tree coverage)
- Chase patterns: Sequential illumination creating apparent movement
- Fade effects: Gradual brightening/dimming versus abrupt on/off
- Synchronized twinkle: Multiple lights flash simultaneously (best used sparingly)
For most effective placement, position twinkling elements where they’ll reflect off other surfaces—hanging from trees over water features, near windows, or adjacent to metallic decorations. This multiplication effect creates depth that static lights cannot achieve.
A technical insight often overlooked: twinkling lights create higher electrical loads during pattern shifts. When designing complex displays, professionals recommend calculating power requirements based on maximum load scenarios and using separate circuits for twinkle-heavy zones to prevent overloads and breaker trips.
Gazebo & Pergola Transformation: Overhead Enchantment
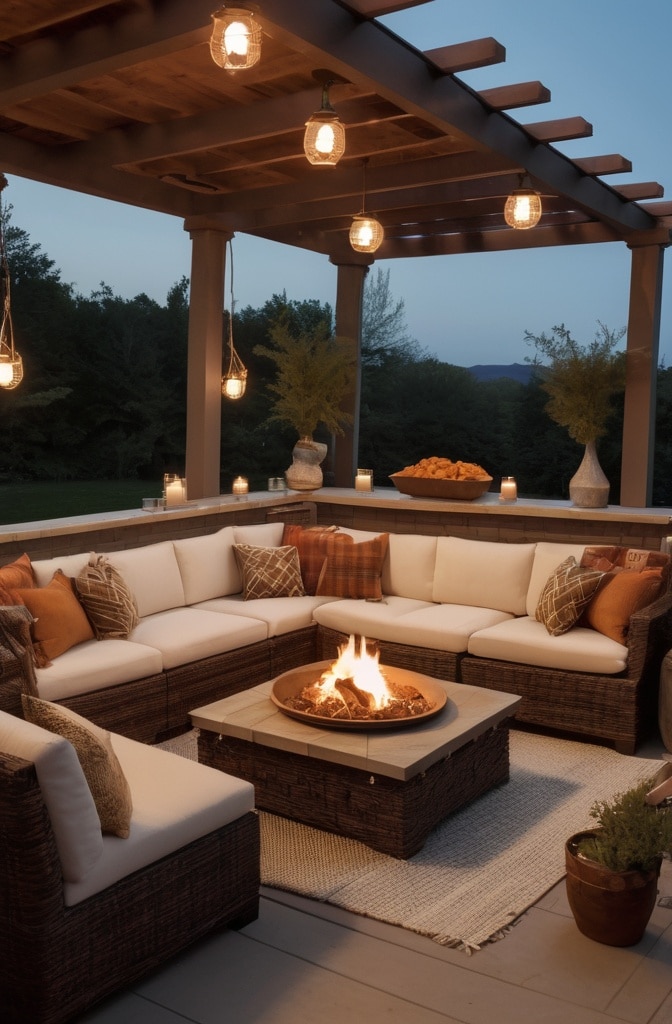
Gazebos and pergolas offer perfect frameworks for creating immersive light experiences. Their overhead structures provide natural support for dramatic lighting installations without requiring additional infrastructure.
“We approach gazebos as light sanctuaries—spaces completely transformed by immersive illumination,” explains event lighting specialist Amanda Torres. “The psychological effect of being surrounded by overhead lighting creates intimate gathering spaces even in cold weather.”
Techniques for transforming these structures include:
- Ceiling effects: Creating solid planes of light using netting or crosshatched string lights
- Curtain lighting: Vertical light strands creating semi-transparent walls
- Structural outlining: Emphasizing architectural elements with defined light lines
- Chandelier effects: Clustering light sources at central points for focused brilliance
An increasingly popular application uses pergolas as “light tunnels” creating magical walkway experiences. By densely wrapping vertical supports and creating overhead canopies of lights, these structures become immersive passageways that transition visitors between different zones of your overall display.
For weatherproofing connections in these exposed installations, professional installers recommend dielectric grease on all connection points followed by self-fusing silicone tape—unlike electrical tape which eventually unwraps in cold weather, silicone tape chemically bonds to itself creating truly waterproof seals.
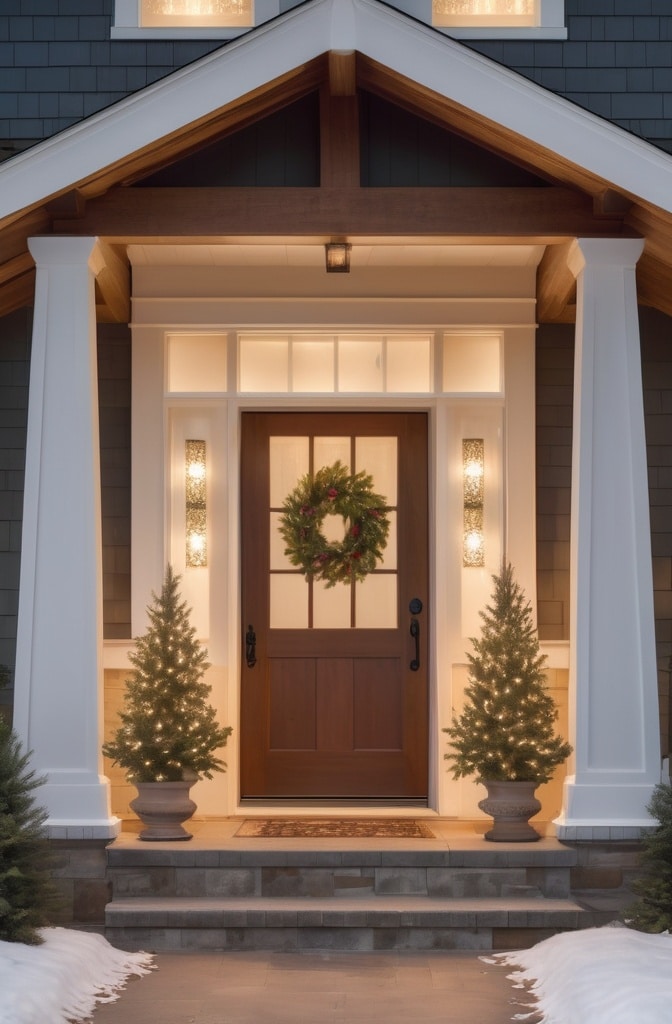
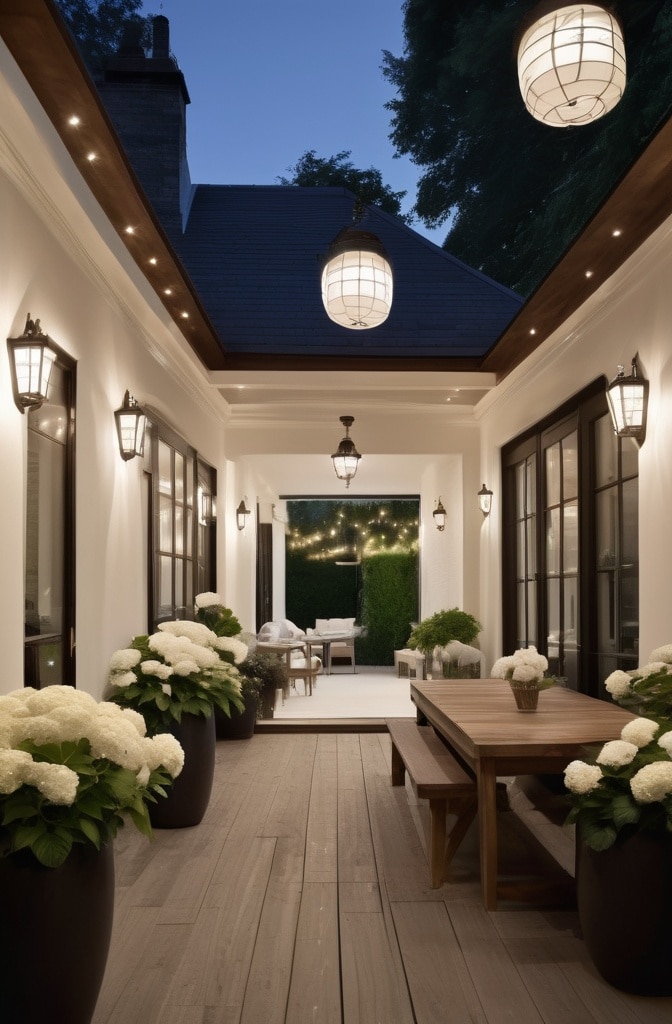
Doorway & Window Enhancement: Framing Your Home’s Features
Doors and windows represent the literal and metaphorical openings of your home to the world, making them symbolically powerful locations for holiday lighting emphasis. Professional-looking treatments go beyond simply outlining these features.
“Entryways should be treated as transitions between everyday reality and holiday magic,” suggests designer Carlos Mendez. “The lighting treatment should intensify as visitors approach the door, building anticipation.”
For impressive doorway lighting:
- Layer elements—start with garland, add string lights, then incorporate larger focal elements
- Create depth using multiple planes—door surface, surrounding frame, and extended porch areas
- Consider asymmetrical designs which draw the eye more effectively than perfect symmetry
- Use timer systems that ensure entryways remain lit later than other display components
Window treatments benefit from coordination with interior decorations. By echoing colors, patterns or themes visible through the glass, you create cohesive experiences that connect indoor and outdoor holiday elements. According to a 2023 survey by Decorator’s Warehouse, homes that coordinate interior and exterior holiday lighting schemes are rated 35% more appealing by visitors than those with disconnected approaches.
For homes with architectural challenges like disproportionately small windows or oversized doors, strategic lighting offers visual correction. Extending light frames several inches beyond actual window dimensions can make them appear larger, while vertical light elements can visually reduce the dominance of oversized features.
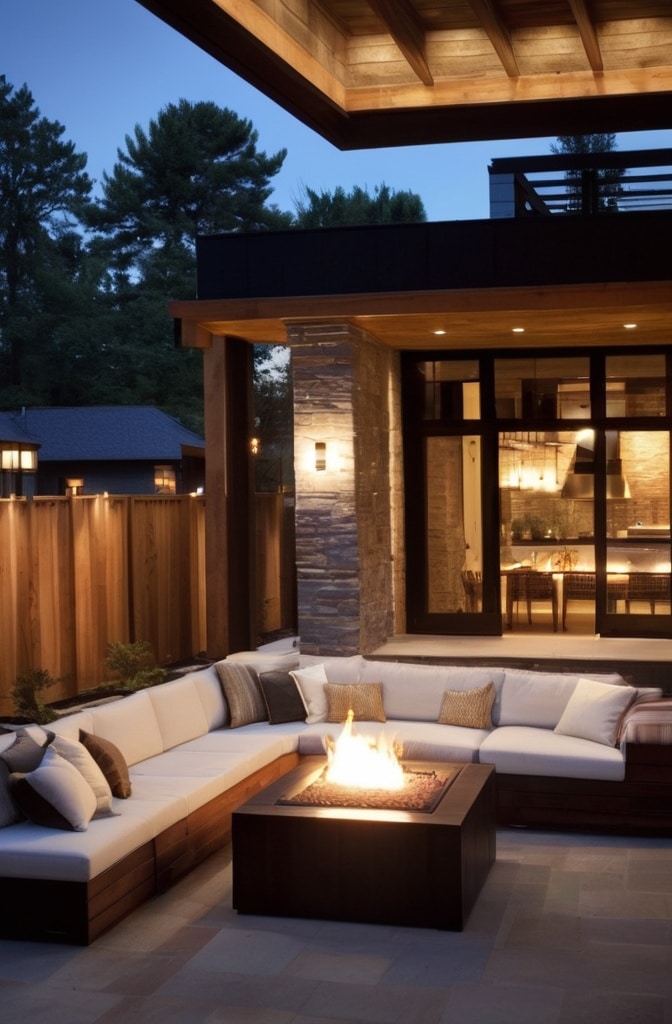
Cozy Outdoor Seating Areas: Extended Holiday Entertaining
Thoughtfully illuminated outdoor seating areas extend usable entertaining space during the holiday season, especially in milder climates. Creating these spaces involves balancing adequate light for function with atmospheric illumination for ambiance.
“The goal is creating pockets of warmth—both literal and visual—that draw people outdoors despite cooler temperatures,” explains outdoor living specialist Rachel Montgomery. “Lighting plays critical psychological roles in making spaces feel warmer than they actually are.”
For welcoming outdoor gathering spaces:
- Layer lighting at multiple heights—ground level, seating height, and overhead
- Incorporate gentle movement with subtle twinkling or fire elements
- Balance functional lighting (pathways, steps) with purely decorative elements
- Consider sound integration—some newer lighting systems include weatherproof speakers
For inclement weather flexibility, consider quick-disconnect systems using weatherproof plugs and sockets positioned strategically throughout seating areas. This allows rapid reconfiguration when weather changes, bringing certain elements under cover while maintaining the overall lighting scheme.
Research from the Outdoor Living Institute found that homes with dedicated, lit outdoor gathering spaces during holidays host 40% more social gatherings and report significantly higher satisfaction with their decoration investment—suggesting these functional spaces provide greater experiential returns than purely decorative lighting.
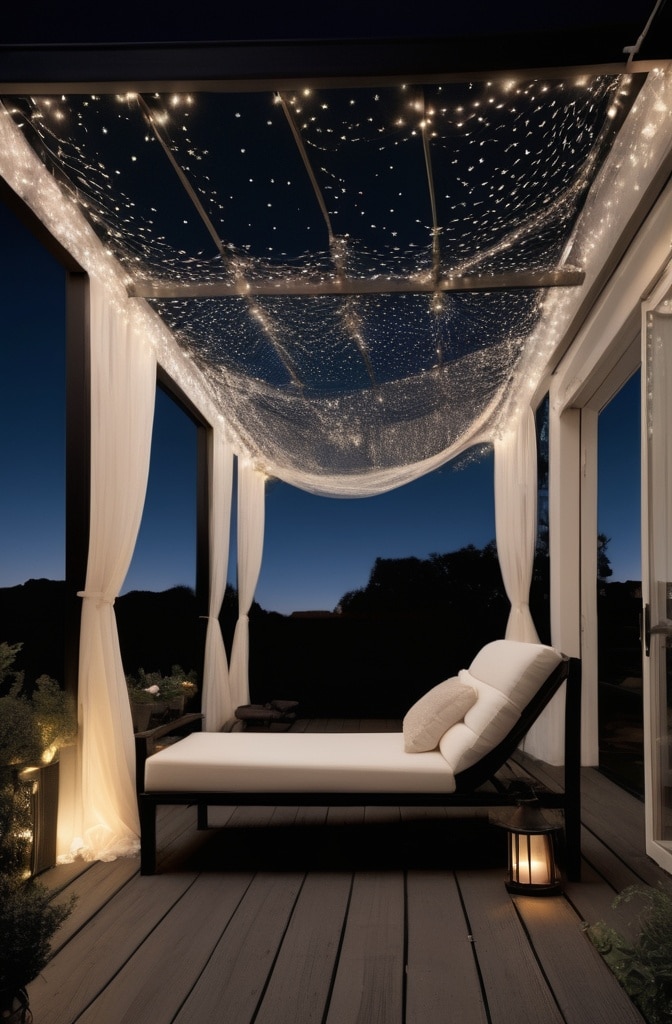
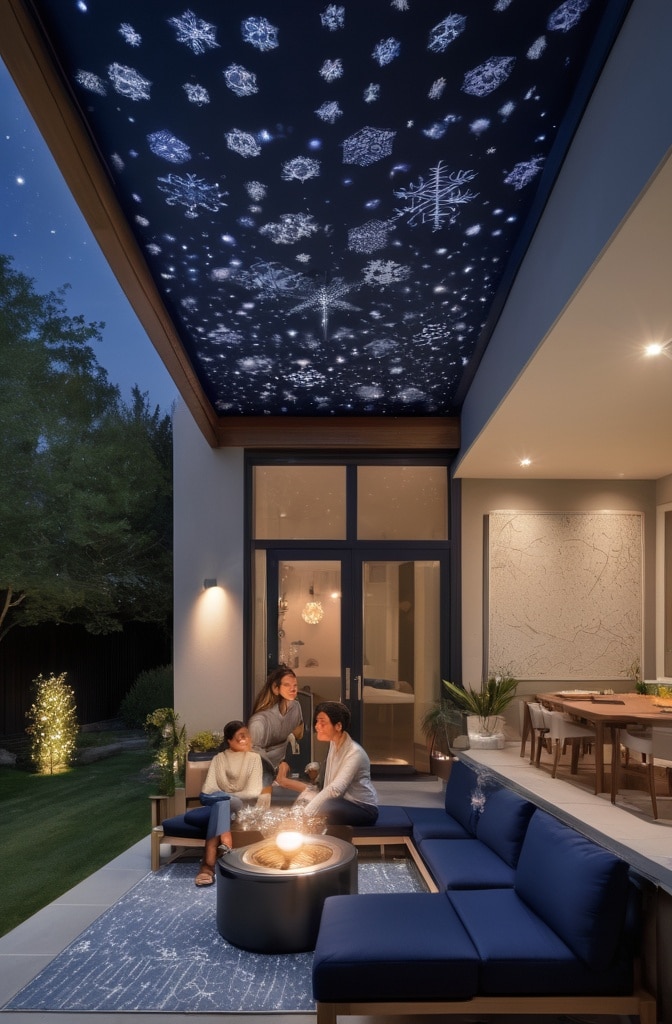
Starry Night Effects: Magical Overhead Displays
Few lighting effects capture imagination like starry night displays, which transform ordinary spaces into celestial wonderlands. Modern technology makes these effects increasingly accessible to average homeowners.
“The human connection to stargazing is primal and emotional,” observes cultural anthropologist Dr. Sarah Martinez. “Recreating celestial patterns triggers deep psychological comfort, particularly during winter’s darkest days when traditional cultures celebrated light’s return.”
Creating compelling starry effects involves:
- Layering different light sizes—pinpoint microlights mixed with occasional larger “stars”
- Incorporating subtle blue undertones among primarily warm white lights
- Varying density to mimic actual night skies—tighter clusters with more open spaces
- Adding dimensional elements that create foreground/background separation
For astronomy enthusiasts, recreating actual constellations adds personalized meaning to displays. Using mapping applications like Stellarium, you can identify constellation patterns visible during December from your location, then recreate these patterns using precision-placed lights. Popular choices include easily recognized patterns like Orion, Ursa Major, and Cassiopeia.
Professional installers achieve enhanced starry effects by combining ceiling-mounted string lights with subtle projection elements, creating layered dimensionality impossible with single-technique approaches. While more complex to install, these combined techniques create immersive experiences that transform ordinary patios and yard spaces into magical retreats.
LED Projector Innovation: Next-Generation Displays
LED projectors represent the cutting edge of holiday lighting technology, offering animation, complex patterns, and rapid changeability without elaborate installation requirements. However, achieving professional results requires understanding both technical limitations and optimal application techniques.
“Projection technology eliminated physical installation challenges but created new ones involving surface compatibility and environmental factors,” explains entertainment lighting technician Marcus Wilson. “The difference between amateur and professional projection setups isn’t the equipment—it’s understanding how to optimize for specific conditions.”
For maximum projection effectiveness:
- Position projectors 10-15 feet from target surfaces for optimal focus and coverage
- Select appropriate surfaces—light, neutral colors without heavy texture provide best results
- Control ambient light—projections compete poorly with nearby bright light sources
- Consider weather protection—most consumer models require sheltered placement
The latest technical advancement for 2024-2025 involves motion-sensing projection systems that change patterns when detecting movement nearby. These interactive displays create engaging experiences particularly appealing to children and technology enthusiasts.
When selecting projection content, consider architectural compatibility rather than simply choosing favorite imagery. Colonial-style homes benefit from classic snowflake and simple geometric patterns, while contemporary architecture supports more abstract and dynamic projections. This architectural alignment creates cohesive rather than competing visual experiences.
Luxurious Layered Lighting: Professional-Looking Compositions
Layered lighting represents the fundamental technique separating amateur from professional-looking displays. Rather than single-technique applications, layering combines multiple lighting types at different heights and depths to create rich visual experiences.
“Professional displays always incorporate at least three distinct layers,” explains celebrity home decorator Julian Foster. “Background structural lighting establishes the framework, mid-ground elements add volume, and foreground focal points create interest and draw attention to specific features.”
Creating effective layers involves:
- Establishing clear visual hierarchy—determining primary focal points versus supporting elements
- Maintaining balanced brightness across zones—typically 3:2:1 ratios between foreground, midground, and background
- Considering viewing angles—layering appears different from various approaches
- Using dedicated circuits for different layers enabling independent control
One designer secret frequently employed in professional installations involves strategic use of negative space—deliberately unlit areas that provide visual relief and contrast. Rather than illuminating everything possible, leaving approximately 20-30% of potential lighting areas dark creates sophisticated, restful displays that appear intentional rather than merely enthusiastic.
Color coordination principles apply particularly to layered displays. For cohesive results, limit color palettes to 2-3 main colors per layer with each layer sharing at least one color with adjacent layers. This creates visual connection while maintaining distinct layer identity.
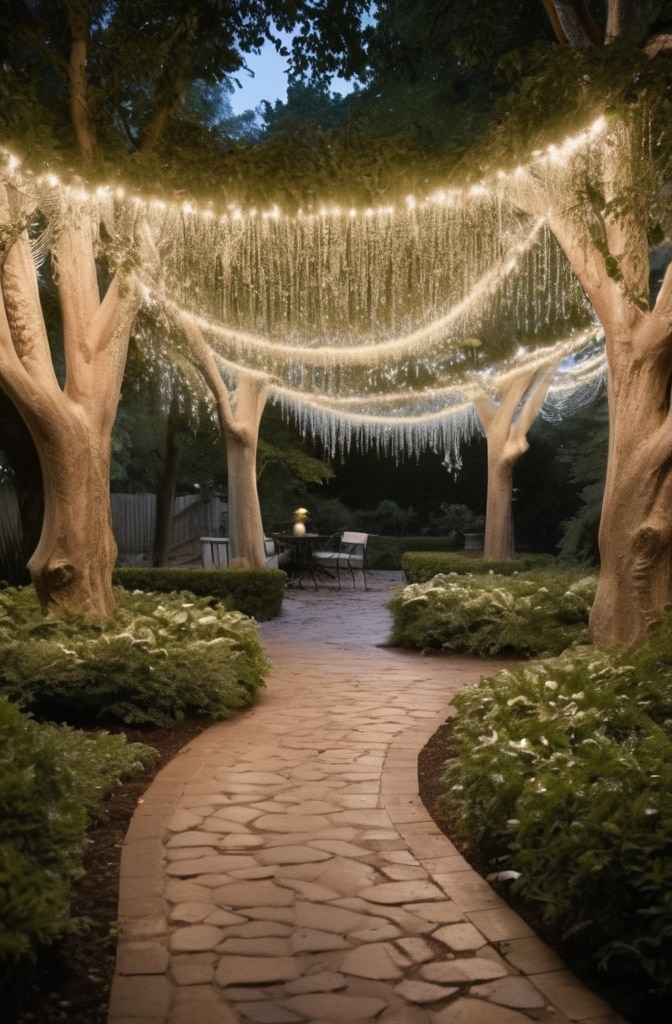
Enchanted Forest Creation: Draping Techniques for Mature Trees
Transforming mature trees into enchanted forest elements requires understanding both aesthetic principles and practical arborist concerns. Different approaches create dramatically different effects from identical tree specimens.
“Trees aren’t merely convenient lighting structures—they’re living design elements requiring thoughtful partnership,” emphasizes certified arborist Patricia Dominguez. “Respectful installation techniques preserve tree health while creating more natural-looking displays.”
Species-specific approaches yield better results:
- Deciduous trees with spreading canopies (oak, maple): Focus 60% of lights on horizontal branch structure
- Conical evergreens (spruce, fir): Spiral patterns emphasizing vertical form
- Multi-trunk specimens (birch clusters): Individual trunk wrapping connecting at canopy
- Palm trees: Trunk emphasis with limited frond outlining
Temporary fastening methods that won’t damage bark include:
- Silicone-based garden ties that expand with growth
- Specially designed tree clips with rubber padding
- Break-away zip ties designed to snap under tension rather than restrict growth
- Natural jute twine for short-term installations (under 30 days)
For creating magical “floating light” effects within mature trees, professional installers recommend working from inside the canopy outward rather than wrapping exterior branches. This technique involves climbing equipment and places approximately 30-40% of lights on interior branches invisible from ground level, creating depth and mysterious illumination that appears to float within the foliage rather than simply outlining the tree.
Driveway Illumination: Making Grand Entrances
Driveway lighting combines practical safety functions with decorative welcome elements, requiring careful balance between visibility and aesthetics. Effective driveway displays coordinate with house lighting while accommodating vehicle traffic requirements.
“The driveway establishes visitors’ first impression and sets expectations for your entire display,” notes landscape lighting specialist Robert Chen. “We approach driveways as narrative introductions—the opening chapter of your holiday lighting story.”
Essential considerations include:
- Safety first—ensuring clear visibility of edges, obstacles and grade changes
- Creating rhythm through evenly spaced elements (typically 6-8 feet apart)
- Maintaining adequate height clearance for vehicles (minimum 7 feet for any overhead elements)
- Using graduated brightness that increases toward the home
A unique emerging trend incorporates synchronized motion-activated elements that sequentially illuminate as vehicles progress along the driveway. These systems use wireless communication between lighting units to create “runway” effects that guide and welcome arriving guests with theatrical flair.
For longer driveways, professional installers recommend dividing into distinct zones with slightly different treatment, preventing monotonous repetition while maintaining cohesive themes. This zoning approach typically uses the same lighting types but varies density, height, or arrangement to create visual interest throughout the approach.
Warm-Cool Contrast: Sophisticated Color Temperature Play
Understanding and intentionally manipulating color temperature represents one of the most sophisticated techniques in holiday lighting design. The strategic combination of warm and cool light creates depth and interest impossible with single-temperature displays.
“Color temperature contrast creates visual excitement through tension between opposing elements,” explains lighting designer Thomas Richards. “The human eye naturally navigates toward these transition areas, making them perfect for highlighting focal elements.”
Understanding Kelvin ratings helps create intentional effects:
- Ultra-warm (1800-2200K): Resembles candlelight or fire glow
- Warm white (2700-3000K): Traditional incandescent appearance
- Neutral white (3500-4000K): Balanced midpoint
- Cool white (5000-6500K): Snow-like, crisp appearance
For sophisticated installations, position warm temperature lights (2700-3000K) on structural elements like rooflines and verticals, with cooler temperatures (4000-5000K) on landscape elements like trees and shrubs. This creates natural visual separation between home and surroundings while respecting the psychological association of warmth with shelter.
Common contrast mistakes include placing cool white icicle lights directly against warm white perimeter lighting, creating jarring transitions. Instead, separate contrasting temperatures with unlit space or gradual transitions through intermediate temperatures whenever possible.
Light Sculpture Creation: 3D Statement Pieces
Light sculptures create focal points that anchor larger displays while offering opportunities for personal expression beyond standard lighting techniques. While commercial options abound, custom creations often become neighborhood signatures and family traditions.
“Light sculptures represent the personality centerpieces of outstanding displays,” observes holiday competition judge Michelle Thompson. “The most memorable neighborhood displays always include unique sculptural elements you won’t see elsewhere.”
DIY frame construction options include:
- PVC pipe frameworks (lightweight, waterproof, easily shaped with heat)
- Coated wire garden fencing (flexible for organic shapes)
- Repurposed metal items like tomato cages (instant dimensional structure)
- Wood frameworks for larger, more permanent installations
Determining appropriate light density depends on viewing distance and desired definition:
- Close viewing (under 20 feet): 2-3 lights per linear inch for clear definition
- Medium distance (20-50 feet): 1-2 lights per linear inch
- Long-distance visibility (50+ feet): Focus on silhouette with accent highlighting
For maximum visibility from street view, position sculptures against simple backdrops where possible—placing intricate designs against busy backgrounds significantly reduces visual impact. Professional displays often use temporary screening (dark landscape fabric) behind important sculptural elements to increase contrast and visibility.
Advanced sculptors create animated effects by using multiple circuits with sequenced controllers. Basic movement effects require minimum 3-4 separate circuits to create convincing motion illusions, while more complex animations may utilize 8-10 distinct circuits programmed in precise sequences.
Color-Changing Technology: Modern Light Shows

Programmable color-changing lighting systems represent the frontier of holiday display technology, offering unprecedented flexibility and entertainment value. However, their effective use requires understanding both technical capabilities and neighborhood-friendly implementation.
“Color-changing technology isn’t about random flashing—it’s about intentional storytelling through light,” explains holiday technology specialist Jennifer Wong. “The most effective displays use programming to create meaningful experiences rather than mere spectacle.”
For sophisticated color-changing installations:
- Begin with static base lighting establishing the primary display structure
- Add color-changing elements as highlights rather than primary components
- Develop intentional sequences that flow naturally rather than abrupt changes
- Consider speed carefully—slower transitions (5-8 seconds) appear more professional than rapid changes
For 2024-2025, the latest app-controlled options offer unprecedented accessibility to effects previously requiring complex DMX controllers and professional programming. Systems from brands like Twinkly and Phillips Hue now offer smartphone control of individual bulbs within strands, enabling gradient effects, complex patterns, and even text display using standard light strings.
For neighbors’ comfort, industry best practices recommend:
- Programming brighter/more active sequences earlier in evening (ending by 9pm)
- Reducing brightness by 30-40% after 9pm
- Limiting music synchronization to special occasions rather than nightly
- Providing schedule information to immediate neighbors
DIY Personalized Projects: Unique Creations

Custom lighting projects incorporating personal elements create meaningful displays that transcend generic decoration. These signature pieces often become cherished traditions passed between generations.
“The most memorable holiday displays incorporate elements that tell family stories,” observes cultural historian Dr. Michael Rivera. “These personalized components transform decorating from mere seasonal activity into meaningful tradition-building.”
Approachable DIY projects include:
- Upcycled item illumination: Transforming everyday objects with strategic lighting
- Custom monogram creation: Family initials or significant years in light
- Memory tributes: Incorporating elements honoring loved ones or special events
- Interactive elements: Displays that respond to viewer presence or participation
For family-friendly craft projects, consider oversized ornaments created from plastic playground balls wrapped with string lights and decorated with weather-resistant materials. These simple projects create large-scale impact while allowing children to participate in creating significant display elements.
Perhaps most meaningfully, many families develop traditions incorporating lighting elements that represent family members—adding new components as families grow or evolve. These living displays become visual representations of family history and connection, transforming holiday decorating from mere seasonal activity into meaningful tradition-building.
Conclusion: Creating Your Magical Holiday Display
As we’ve explored these 23 magical outdoor Christmas lighting ideas, remember that truly remarkable displays aren’t necessarily the largest or most elaborate—they’re the ones created with intention, creativity, and personal meaning.
Start small, perhaps focusing on just 2-3 techniques from this guide for this holiday season. Master those approaches before expanding your display in future years. This gradual development often yields more cohesive and satisfying results than attempting everything simultaneously.
For implementation, consider this practical sequence:
- Outline architectural elements first (rooflines, windows, doors)
- Add vertical elements (trees, columns, sculptures)
- Connect with pathway and ground-level lighting
- Finally, add special accents and focal features
Remember that proper storage significantly extends light lifespan. Investing in specialized reels and storage containers prevents wire fatigue and bulb damage, potentially doubling the usable life of your holiday lighting investment.
Most importantly, allow your display to evolve as an authentic expression of your personal holiday spirit. The most magical Christmas light displays aren’t those that perfectly mimic professional installations—they’re the ones that warmly welcome visitors into your unique celebration of the season.
What lighting traditions will you begin this year?